Now that you have seen the basic syntax of inheritance, let’s create a more complex example and get to know the numerous details of building class hierarchies. To do so, you will be reusing the Employee class you designed in Chapter 5. To begin, create a brand new C# Console Application named Employees
Next, activate the Project < Add Existing Item menu option and navigate to the location of your Employee.cs and Employee.Internals.cs files you created in the EmployeeApp example of previous chapter. Select each of them (via a Ctrl-click) and click the Add button. Visual Studio 2010 responds by copying each file into the current project.
Before you start to build some derived classes, you have one detail to attend to. Because the original Employee class was created in a project named EmployeeApp, the class has been wrapped within an identically named .NET namespace. Chapter 14 will examine namespaces in detail; however, for simplicity, rename the current namespace (in both file locations) to Employees in order to match your new project name:
// Be sure to change the namespace name in both C# files!
namespace Employees
{
    partial class Employee
    {...}
}
Note As a sanity check, compile and run your new project by pressing Ctrl+F5. The program will not do anything at this point; however, this will ensure you do not have any compiler errors.
Your goal is to create a family of classes that model various types of employees in a company. Assume that you wish to leverage the functionality of the Employee class to create two new classes (SalesPerson and Manager). The class hierarchy you will be building initially over the next several pages looks something like what you see in Figure 6-4 (be aware that you will not see individual fields in your diagram if you make use of C# automatic property syntax).
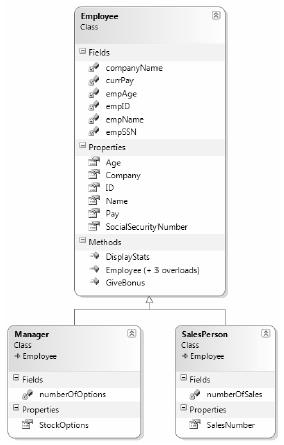
Figure 6-4 The initial Employees hierarchy
As illustrated in Figure 6-4, you can see that a SalesPerson “is-a” Employee (as is a Manager). Remember that under the classical inheritance model, base classes (such as Employee) are used to define general characteristics that are common to all descendents. Subclasses (such as SalesPerson and Manager) extend this general functionality while adding more specific functionality.
For your example, you will assume that the Manager class extends Employee by recording the number of stock options, while the SalesPerson class maintains the number of sales made. Insert a new class file (Manager.cs) that defines the Manager class with the following automatic property:
// Managers need to know their number of stock options.
class Manager : Employee
{
    public int StockOptions { get; set; }
}
Next, add another new class file (SalesPerson.cs) that defines the SalesPerson class with a fitting automatic property:
// Salespeople need to know their number of sales.
class SalesPerson : Employee
{
    public int SalesNumber { get; set; }
}
Now that you have established an “is-a” relationship, SalesPerson and Manager have automatically inherited all public members of the Employee base class. To illustrate, update your Main() method as follows:
// Create a subclass object and access base class functionality.
static void Main(string[] args)
{
    Console.WriteLine("***** The Employee Class Hierarchy *****\n");
    SalesPerson danny = new SalesPerson();
    danny.Age = 31;
    danny.Name = "Danny";
    danny.SalesNumber = 50;
    Console.ReadLine();
}
Currently, SalesPerson and Manager can only be created using the freebee default constructor (see Chapter 5). With this in mind, assume you have added a new six-argument constructor to the Manager type, which is invoked as follows:
static void Main(string[] args)
{
...
    // Assume Manager has a constructor matching this signature:
    // (string fullName, int age, int empID,
    // float currPay, string ssn, int numbOfOpts)
    Manager chucky = new Manager("Chucky", 50, 92, 100000,             "333-23-2322", 9000);
    Console.ReadLine();
}
If you look at the parameter list, you can clearly see that most of these arguments should be stored in the member variables defined by the Employee base class. To do so, you might implement this custom constructor on the Manager class as follows:
public Manager(string fullName, int age, int empID,
    float currPay, string ssn, int numbOfOpts)
{
    // This property is defined by the Manager class.
    StockOptions = numbOfOpts;

    // Assign incoming parameters using the
    // inherited properties of the parent class.
    ID = empID;
    Age = age;
    Name = fullName;
    Pay = currPay;
    // OOPS! This would be a compiler error,
    // if the SSN property were read-only!
    SocialSecurityNumber = ssn;
}
The first issue with this approach is that if you defined any property as read-only (for example, the SocialSecurityNumber property), you are unable to assign the incoming string parameter to this field, as seen in the final code statement of this custom constructor.
The second issue is that you have indirectly created a rather inefficient constructor, given the fact that under C#, unless you say otherwise, the default constructor of a base class is called automatically before the logic of the derived constructor is executed. After this point, the current implementation accesses numerous public properties of the Employee base class to establish its state. Thus, you have really made seven hits (five inherited properties and two constructor calls) during the creation of a Manager object!
To help optimize the creation of a derived class, you will do well to implement your subclass constructors to explicitly call an appropriate custom base class constructor, rather than the default. In this way, you are able to reduce the number of calls to inherited initialization members (which saves processing time). Let’s retrofit the custom constructor of the Manager type to do this very thing using the base keyword:
public Manager(string fullName, int age, int empID,
    float currPay, string ssn, int numbOfOpts)
    : base(fullName, age, empID, currPay, ssn)
{
    // This property is defined by the Manager class.
    StockOptions = numbOfOpts;
}
Here, the base keyword is hanging off the constructor signature (much like the syntax used to chain constructors on a single class using the this keyword as was discussed in see Chapter 5), which always indicates a derived constructor is passing data to the immediate parent constructor. In this situation, you are explicitly calling the five-parameter constructor defined by Employee and saving yourself unnecessary calls during the creation of the child class. The custom SalesPerson constructor looks almost identical:
// As a general rule, all subclasses should explicitly call an appropriate
// base class constructor.
public SalesPerson(string fullName, int age, int empID,
    float currPay, string ssn, int numbOfSales)
    : base(fullName, age, empID, currPay, ssn)
{
    // This belongs with us!
    SalesNumber = numbOfSales;
}
Note You may use the base keyword anytime a subclass wishes to access a public or protected member defined by a parent class. Use of this keyword is not limited to constructor logic. You will see examples using base in this manner during the examination of polymorphism later in this chapter.
Finally, recall that once you add a custom constructor to a class definition, the default constructor is silently removed. Therefore, be sure to redefine the default constructor for the SalesPerson and Manager types, for example:
// Add back the default ctor
// in the Manager class as well.
public SalesPerson() {}
As you already know, public items are directly accessible from anywhere, while private items can only be accessed by the class that has defined it. C# takes the lead of many other modern object languages and provides an additional keyword to define member accessibility: protected.
When a base class defines protected data or protected members, it establishes a set of items that can be accessed directly by any descendent. If you wish to allow the SalesPerson and Manager child classes to directly access the data sector defined by Employee, you can update the original Employee class definition as follows:
// protected state data.
partial class Employee
{
    // Derived classes can now directly access this information.
    protected string empName;
    protected int empID;
    protected float currPay;
    protected int empAge;
    protected string empSSN;
    protected static string companyName;
...
}
The benefit of defining protected members in a base class is that derived types no longer have to access the data indirectly using public methods or properties. The possible downfall, of course, is that when a derived type has direct access to its parent’s internal data, it is very possible to accidentally bypass existing business rules found within public properties. When you define protected members, you are creating a level of trust between the parent and child class, as the compiler will not catch any violation of your type’s business rules.
Finally, understand that as far as the object user is concerned, protected data is regarded as private (as the user is “outside” of the family). Therefore, the following is illegal:
static void Main(string[] args)
{
    // Error! Can't access protected data from object instance.
    Employee emp = new Employee();
    emp.empName = "Fred";
}
Although protected field data can break encapsulation, it is quite safe (and useful) to define protected methods. When building class hierarchies, it is very common to define a set of methods that are only for use by derived types.
Recall that a sealed class cannot be extended by other classes. As mentioned, this technique is most often used when you are designing a utility class. However, when building class hierarchies, you might find that a certain branch in the inheritance chain should be “capped off,” as it makes no sense to further extend the linage. For example, assume you have added yet another class to your program (PTSalesPerson) that extends the existing SalesPerson type. Figure 6-5 shows the current update.
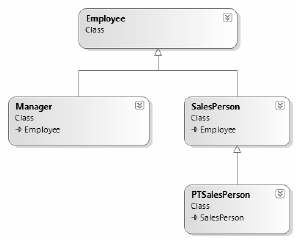
Figure 6-5. The PTSalesPerson class
PTSalesPerson is a class representing, of course, a part-time salesperson. For the sake of argument, let’s say that you wish to ensure that no other developer is able to subclass from PTSalesPerson. (After all, how much more part-time can you get than “part-time”?) Again, to prevent others from extending a class, make use of the sealed keyword:
sealed class PTSalesPerson : SalesPerson
{
    public PTSalesPerson(string fullName, int age, int empID,
            float currPay, string ssn, int numbOfSales)
        :base (fullName, age, empID, currPay, ssn, numbOfSales)
    {
    }

        // Assume other members here...
}
Given that sealed classes cannot be extended, you may wonder if it is possible to reuse the functionality found within a class marked sealed? Glad you asked! If you wish to build a new class that leverages the functionality of a sealed class, your one option is to make use of the containment/delegation model (aka the “has-a” relationship).